# Using Studio From Behind a Proxy
# Overview
Studio requires an internet connection to authenticate the user to the Appcelerator cloud on the first launch, although the credentials are cached for subsequent use. Also, internet access is used for news, documentation, and code updates. This guide explains how to configure it for use behind a proxy. For Windows systems, use the system proxy settings (see the Windows system settings section below for details).
# Startup splash screen
If no user credentials are available for Studio on launch, the Studio splash screen will ask you to enter your user name and password. At the bottom of this dialog, click the Proxy Setup... link to open the following dialog:

The proxy schema (HTTP, HTTPS, and SOCKS are all supported), server name or IP address, service port number, and authentication details can be configured. After clicking OK, then Login to start, all internet traffic will be directed via this proxy.
# Preferences window
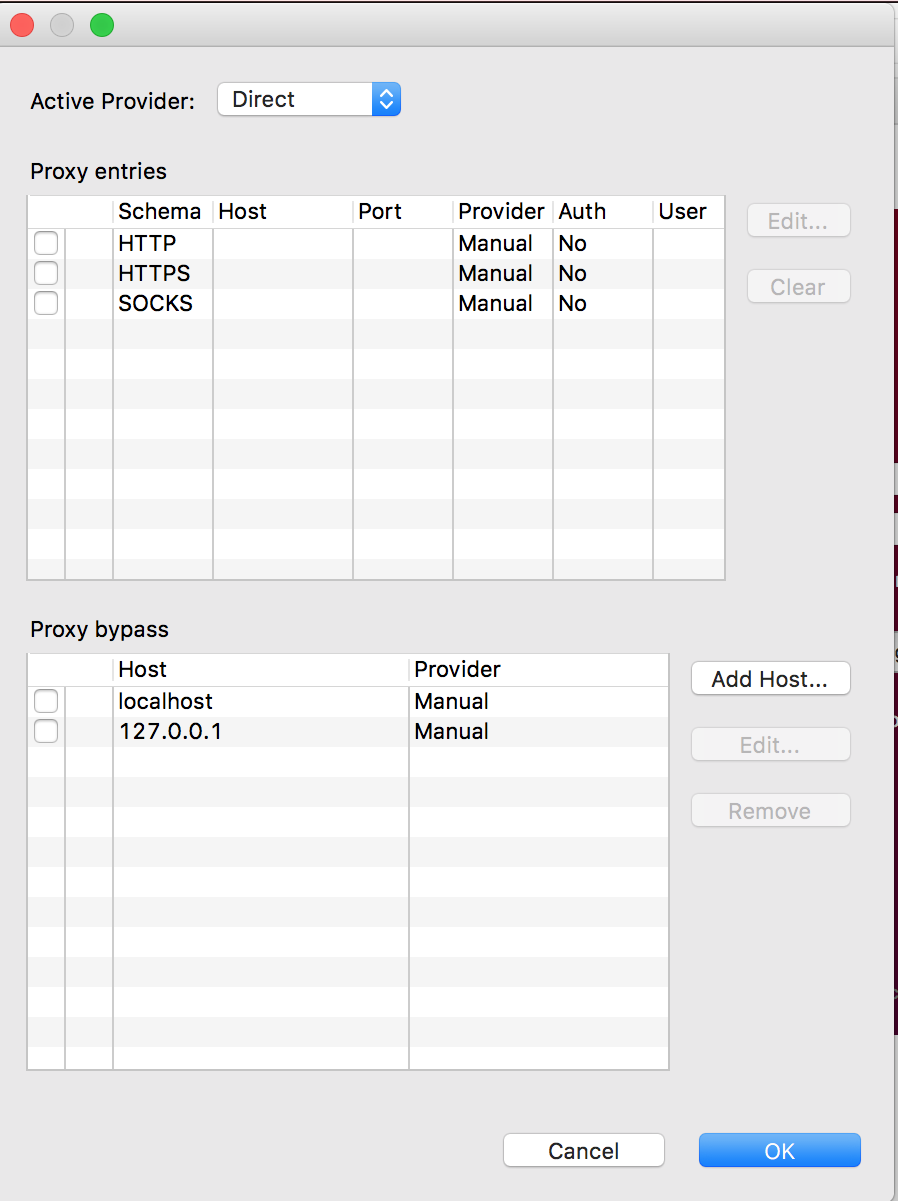
To configure your proxy settings once Studio has started, open the Preferences window and navigate to Network Connections:
From the menu bar,
Windows: select Windows > Preferences.
Mac OS: select Titanium Studio > Preferences or Appcelerator Studio > Preferences.
Navigate to General > Network Connections.
Select the Proxy entry that you would like to edit, for example, HTTP, and click Edit...
In the Host and Port fields, specify the name or IP address and port number of your proxy server.
If you have authentication enabled, check the Requires Authentication box and type in your proxy User and Password.
Click OK to apply your settings.
Restart Studio. All internet traffic will be directed via this proxy.
# Windows system settings
For Windows systems, Studio should use the system's proxy settings. You may need to enter the proxy settings when the splash screen appears to get to the Preferences window to change the settings.
From the menu bar, select Windows > Preferences.
Navigate to General > Network Connections.
Change the Active Provider drop-down to Native.
Click OK to apply your settings.
Restart Studio. All internet traffic will be directed via the Windows system proxy settings.
# Whitelisting URLs
You may need to whitelist several URLs in some network environments. Below are the set of URLs to whitelist. If possible, it is easiest to whitelist *.appcelerator.com.
Web access
Software
admin.cloudapp-enterprise.appcelerator.com (opens new window)
preview.appcelerator.com (opens new window) (only for beta software downloads)
The port numbers used for the URLs are 80 and 443.
For debugger and profiler, Studio will find a free port for the specific IP address, and if it does not locate one, it will use 8999 as the default. For LiveView, it requires ports 8323 and 8324.
For the local web server that Studio creates, the range of the port Studio looks for is controlled by the preference defined in Preferences > Studio > Web Servers > Built-in. By default, the range is 8020-8079.
# Network connections
This section describes the preferences available on the General > Network Connections preference page.
| Option | Description | Default |
|---|---|---|
| Active Provider | Specifies the settings profile to be used when opening connections. Choosing the Direct provider causes all the connections to be opened without the use of a proxy server. Selecting Manual causes settings defined in Eclipse to be used. On some platforms, there is also a Native provider available, selecting this one causes settings that were discovered in the OS to be used. | Native (if present) Manual (otherwise) |
| Proxy entries | The table displays entries that are available for all providers. Checkboxes in the first column of the table indicate entries to be used for the currently selected provider. | |
| Proxy bypass | Use this table to specify, either by name or pattern, which hosts should not use any proxy. A direct connection will always be used for matching hosts. Checkboxes in the first column of the table indicate entries to be used for the currently selected provider. |
# Proxy entries
When using Manual proxy provider, there are three predefined schemas to set settings for: HTTP, HTTPS, and SOCKS. Configuration for each schema is displayed in the Proxy entries table. To edit settings for a particular schema, double-click the entry or select the entry and click Edit... button. If the Port field is left blank, the default port number will be used. Following table lists default port numbers for each of the predefined schemas.
| Schema | Default Port |
|---|---|
| HTTP | 80 |
| SSL | 443 |
| SOCKS | 1080 |
This section was adapted from Eclipse's Network Connections (opens new window) document.